Pumpkin Spiced Bundt Cake

img_1701With such an amazing haul of  pumpkins and butternut squash harvested from the allotment this year, I was on the lookout for a new recipe to use this produce. I have always been a fan of Nigella, and her new book Simply Nigella, has an amazing recipe for Pumpkin Bundt Cake. img_2062

The ingredients used to make this cake are not dissimilar to that of the carrot cake, however as I am not too keen on cinnamon, I added my own personal touch and replaced the cinnamon as stated in the recipe with a Pumpkin Spice Mix that I acquired from Betty Crocker’s website. Once this pumpkin spice mix is made, which will take a few minutes in total, it can be kept in an air tight jar for many months to use again with a variety of deserts, puddings and cakes as well as spicing up biscuits.

Of course Nigella made the cake in an eye catching fancy Bundt tin so in order to follow the recipe to the max, I just had to treat myself to one of these tins! I actually got a bargain from my local Aldi with this one. It was really robust with a great non stick coating and I even got change out of a tenner! Within this new addition to my baking tin collection, I must get my imaginative juices flowing so I can create more recipes just so I can get to give the tin an outing.

Happy bakin’

Debb

Posted in Recipes, Uncategorized | Tagged , , , , , , | 6 Comments

Who said Autumn had to be dull and grey?

piccollage

Posted in Allotment | Leave a comment

Pruning Pepper Plants

imageI am an avid chilli and sweet pepper grower and these are always the first seeds that I sow during the year. My chilli sowing starts in my heated propagator in February as the seeds need heat to germinate and  are notoriously slow at popping their heads through the soil. I mainly grow my chillies and peppers at my greenhouse at home so that I can keep an eye on them and tend them if necessary.

The main reason for me writing this post is to let you know how brave I have been! I know that with some plants, to encourage new growth, or to give existing plants a chance to thrive, you as a gardener have to take drastic measures by chopping and cutting stems and leaves.   I always found this task to be too painful to execute and as a result I have been missing out on getting the most from my plants.

image

Growing tip nipped out

Usually, I get average yields from my chilli plants but they did tend to grow really tall and not very bushy. However I recently did a bit of research on pruning chillies and peppers and decided that while mine were still relatively smallish plants, I would take the plunge and give it a go with some of my plants.

image

New bushier growth

My purple cayenne chillies were the first victims of the pruning procedure and I can say with true honesty that they have come to no harm whatsoever after their encounter with my trusty secateurs. I simply snipped the top growing point off to prevent the plant from having one leading point to encourage more growth from the joint between the leaf node and stem.  And it worked!!!!!! In fact they have never looked so healthy.

My initial experiment was only going to be applied to one or two plants but since the success of the two that I chopped, I thought I would repeat it for 75% of the rest of my plants. The plants have thrived and given some vigorous growth from various points on the plant that should hopefully give me more chillies in return! My plants seem to love this new haircut and are sending out new leaves everywhere!  The only plants that I haven’t done this experiment with are my scotch bonnet and habaneros as the research suggests that there is no need to do this for those type of plants as they are the bushier variety anyway.

Be brave and give it a go!

Happy diggin’

Debb

Posted in Allotment | Tagged , , , , , , , , | Leave a comment

Spuds galore in10″ pots …..update

Potatoes 29th May

Potatoes 29th May

A very quick visual update of how my potatoes in 10″ pots are doing.  They seem to be thriving in the garden; not surprisingly with all of the rain that we have experienced lately but I’m well impressed with the foliage that they are displaying.  They were all topped up to the top of their pots around the beginning of May as their leaves were poking through the soil, but we were still experiencing frosts.  They seem to have come through the cold stages unscathed.

Filling out nicely 8th June

Filling out nicely 8th June


Since taking these pictures, they have displayed their flowers and look even fuller than they do in the photos.  I am really hoping for good results from this experiment and if Home Grown Veg’s potato reveals are anything to go by, then I should be ok. Here’s hoping for great results beneath the soil as well as above!


Watch this space for harvesting results in a couple of weeks!

Happy diggin’

Debb

Posted in Allotment | Tagged , , , , , , , , , | Leave a comment

Spuds galore in 10″ pots…….

I am an avid YouTuber, preferring to watch the videos rather than star in them and I recently came across a gardening channel called Home Grown Veg.  Now as far as I can gather, he grows his fruit and veg in his back garden as I have yet to hear him mention or see him on an allotment plot.  One of the things that inspired me to continue watching and inevitably subscribe to his future videos, was growing veg in 10inch pots on his patio.

imageMost of these pots that he uses are in fact recycled flower buckets that he purchased from Morrisons, roughly 10p per pot!  I do, in fact have some of these pots around my garden as I use them for growing my chillies and tomatoes in the greenhouse, so I was halfway there to following along.

He occasionally uses recycled compost from his plants that have already provided him with a crop and would have otherwise been destined for the compost heap.  The veg that inspired me the most was growing salad potatoes in 10″ pots.  I was very sceptical at the yield that these relatively small pots would produce until I saw his returns from the one seed potato that he had sown in each pot. Roughly around 1.5 – 2lbs per pot.  Not a bad return for one potato and recycled compost.

He had also experimented with growing potatoes that he has purchased at his local supermarkets for consumption rather than buying specific certified seed potatoes.   He simply keeps a few specimens back and keeps them dry and cool in the bottom of his fridge until he is ready to use them, by that time they would have started to imagedevelop chits ready to start growing.  So my afternoon today was spent potting up 25 pots of Charlotte salad potatoes. Not all in 10″ (10 litre) pots, but also in 35 litre pots too.  One seed  in the smaller 10″ pots and 3 seed potatoes in the larger pots.  Guess I won’t run out of spuds later in the year.

Home Grown Veg YouTube channel is definitely worth a look and stay tuned for my details on the carrots in 10″ pots too!!!!!

Happy diggin’

Debb

Posted in Allotment | Tagged , , , , , | 3 Comments

Sweet strawberries in mind……

20140320-132504.jpgSo my Easter Monday was really busy doing my seedlings and transplants in the greenhouse due to the ever changing weather, but today was a whole new ball game! The weather at least was on my side, but for how long, I wasn’t sure. Today’s itinerary mainly consisted of getting my strawberries in check.

At my allotment plot I have 3 beds of equal size at the front of the site. One of these has my established strawberry bed that was set up last year. These have only produced fruit for one year so far.  The runners from these plants last season were transplanted temporarily into my enamel bath on site just to give them a head start with establishing the roots until the new bed 2 was ready for them.

imageBed 1 was looking very shabby and needed a facelift while bed 2image 
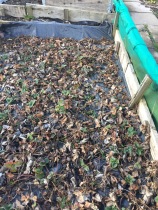
needed to be prepared and planted up with the runners from last year. I left bed 1 in a mess last year so that the added leaves would provide some sort of winter protection for the crowns and it seems to have done the trick. Most of the plants looked really healthy, albeit a little sorry for themselves after the clear up. I must admit the plants look so much better after a quick haircut and a tidy up. I also gave them a very quick liquid fertiliser feed that consisted of a little bit of liquid manure added to a watering can just to give them a quick boost.

My next job was to prepare bed 2 for the new plants and staple the membrane that covers imagethe ground and cut new holes for the plants. My plan is to only keep original strawberry plants for a maximum of 3 years then replace with the runners from the younger, more healthy plants.

I also have lots of strawberries at home. Can you tell that they are one of our favourite fruits! This warm break in the weather encouraged me to tidy up my pots and troughs at home as well.

As I was leaving the allotment I noticed that there were two old metal shelving units that had been image
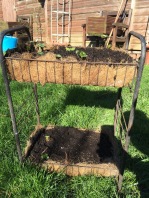
discarded. I had a quick glance around an quickly whipped them away in the boot of my car! Once safely at home, I laid the shelves with coir matting that was surplus for my hanging baskets and added a layer of black plastic to help retain the water. I then replanted the strawberry plants that I had in some pots at home and I must admit that they look pretty good. I had to convince my Hubbie that they would look so much better in the next few months when the plants start to cascade down.

imageThe womble in me lives on!

Now though, I’m all strawberried out. Just need to start saving some jars ready for my jam making escapades 😊

Happy diggin’
Debb

Posted in Allotment, recycle | Tagged , , , , | 4 Comments

Ready, Set, Sow……..

This Easter Monday bank holiday weather was very unpredictable; one minute blowing gales and wind then into calm blue and white skies thereafter. Then next the dark clouds descended upon bringing with them torrential downpours giving me the oppourtune moment to change my gardening plans. So today I wasn’t going to let the weather get the better of me.  I was going to continue on with my gardening escapades regardless of what the weather decided to throw at me.  I decided to spend the time in the greenhouse catching up with my seed planting.

I had a very productive afternoon. I transplanted my lettuce seedlings and my beetroot seedlings, planted many varieties of pumpkins and squashes along with outdoor cucumbers and gherkins. I sowed some more pea seeds in my guttering in my greenhouse and transplanted my tomato seedlings that were looking a little bit worse for wear. I’m hoping that they will all catch up over the next few weeks if we get some decent sunshine.

I also planted various types of basil, to be used as companion planting along with my tomatoes. I planted sweet basil, Greek basil and lemon basil. I’m not holding out much hope for my thyme and mint seeds as these were seeds that I had in my seed pack for quite a few years, but as I had a little spare soil and a few extra pots, I thought what was the harm. If they grow, then that’s great I will find a place for them. If they don’t grow, over the next 3-4 weeks then I will just repurpose the soil and the pot for something else.

I also made use of my root trainers that I bought a few months ago. I potted these up with two varieties of sweetcorn. I know that if all of them grow this should be 100 plants!!!. I know yes you’re thinking what is she going to do with 100 plants of sweetcorn if they all do decide to germinate? However I like to grow seeds and I get so much satisfaction from giving them away to others.  So here’s hoping to great germination with all my newly planted seedlings and speedy growth with all my transplants so that others may also benefit from my labours.

Happy diggin’

Debb

Posted in Allotment | Tagged , , , , , , , , , | 4 Comments

Potato chitting time….

So now it’s potato chitting time and I just had a quick query as to how others start their potatoes off and if so, where do they do it?

image I always sneak some in egg trays on top of the boiler in my kitchen. It’s out of the way, warm and light and hidden from my hubbies eyes! I also place a couple in egg boxes on my windowsill in the kitchen. One year, I had so many chitting that I didn’t have the space for them all in the kitchen so I placed them in my unheated greenhouse. Even though they were covered with fleece the frost still managed to get to a few of them so I thought it was better to be safe than sorry and position them inside.  Where do you place yours to chit?

Happy diggin’

Debb

Posted in Allotment | Tagged , , | 10 Comments

Return of digginwivdebb…….

I’ve been off the blogging scene for quite a while, well to be honest round about a year. Life and all other commitments tended to take priority over my blogging. Recently, I realised that I had missed the blogging scene even though I was still keeping up with my writing of my growing adventures by providing monthly newsletters to my allotment site. These were gratefully received by the plot holders, but I missed the blogging community. Although in previous years I shared many posts, I also got a great deal of information and pleasure from reading other people’s posts, so I have decided to return to my blogging and continue to share my growing escapades with you all. 

The posts may not be as detailed and as lengthy as they have previously been, just short sharp words of wisdom or just things that I would like to share as and when they arise. I hope that you find them of use and I hope that you will continue to follow me on my allotment growing journey.

Happy diggin’

Debb

Posted in Allotment | Tagged | 4 Comments

Tomato seeds at the ready!

So the varieties of tomatoes that I’m growing this year are as follows;

* Sweet Aperitif (cherry)

* Alicante (medium cordon)

* Shirley (medium cordon)

* Oxheart (beefsteak)

* Red pear (cherry)

I have also sown a few unknown varieties. These were tomatoes that were donated to me after seeing a great specimen that had grown. They are collectively named after the people who provided them to me.

* Momma Love (beefsteak)

* Richard (cherry)

* Mini Mej (bush cherry)

Seeds at Day 2 germination

Seeds at Day 2 germination

The first seeds off the block in the heated propagator are the unknown variety courtesy of an allotment friend named Richard. He mentioned that these varieties produced an abundance of tomatoes on his plot, outside his greenhouse.

Seeds at Day 7 germination

Seeds at Day 7 germination

He allowed me to help myself to a few of the stray tomatoes still left on the plant which I then soaked in water for a few days to remove the outer jelly like membrane, then dried on a plate ( no kitchen paper added as I had learned from experience that the seeds, when dried, tended to stick to the paper making it difficult to remove them) and then stored in a paper envelope ready for planting this year. I was very surprised that these were the first tomatoes from all of the varieties that I had grown to first rear their heads. I have grown many more seeds than I need, yet again, but this is so I can pass them on and share with others fellow allotmenteers.

Happy diggin’

Debb

Posted in Allotment | Tagged , , , , , , , , , , | Leave a comment